Saturday, May 14, 2011

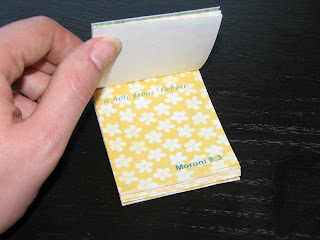
How to make a tear-out notepad

Below are the instructions to make this fun little notepad....enjoy!

Supplies:
1) double sided sticky tape
2) rubber cement
3) paper scorer
4) paper cutter
5) VERY heavy card stock (I purchased mine at a specialty paper store) or chipboard
6) 20# paper of choice (I scanned my scrap booking paper and printed onto 20# printer paper to get a matching notebook and cover). I used 4 pages cut to 9-2 1/2x3-inch pieces, making 36 sheets for my notebook.
7) heavy scrapbook paper of choice cut to 3x4-inches


(3)Score (7)scrapbook paper at 3 1/16" and then again at 3 5/16". Apply
(1)double sided tape to short end (see picture below).


Attach (5)Heavy card stock to (7)scrapbook paper being sure to butt the short side of the card stock right up against the scored edge. Apply (2)rubber cement liberally to the (7)scrapbook paper between score marks (picture below).


With the stack of (6)#20 paper apply the (2)rubber cement generously to the short end of the stack (picture below...sorry about the quality).

Be sure to press the (6)stack of paper firmly into the space between score marks until dry to the touch, this takes approximately 5 minutes. Set aside to fully dry.


Viola, you have yourself a beautiful little notepad that has tear-out pages.

Happy Crafting!

Friday, May 13, 2011

Sneak peek

I had some difficulty this morning posting instructions for this cute personalized note pad. Check back later for detailed instructions.

Monday, May 9, 2011

Wow, Happy Mother's Day to ME!

....and Father's Day to my husband. I now understand why people can say that their build project was an afternoon project. No more hand saw.

I ♥ my chop saw!

 You KNOW it's important if the hubby needs to read the instruction manual! I don't think he's EVER broken into one in all of the 12 years we've been married.
 Isn't she BEAUTIFUL!
Stay tuned to find out what I'm making with it.....

Saturday, May 7, 2011

My Farmhouse Bedside Table

So, I'm not a builder. Really! Okay, I don't think that picture frames and a doll bed qualify me as a builder, but it's something I'm starting to really love. This build is what I'm adding to my resume for sure! The basic plans can be found here. To get this particular finish follow the steps below.
I started by giving my piece a worn out look, see video on how to achieve this look. I then spray painting my piece with two light coats of Valspar Baby Blue in a satin finish (found at Lowe's) with about a 30 minute drying time between each coat. After the final coat dried I sanded the piece being sure I distressed the edges well and in some flat places as well.
 After I sanded and wiped my piece down with a damp cloth I was ready for the stain. This is really where you'll see the 'worn out' look come to life. Using Minwax Dark Walnut stain and an old cotton t-shirt I applied with the grain making sure to saturate the piece especially in any crevices that would hold the stain and accentuate the 'old' look I wanted. I would then quickly wipe away with a clean cloth (this will take some practice to get the exact look you want so I suggest that you practice on a scrap piece of wood first). Minwax recommends that you wait a minimum of 8 hours. I waited at LEAST two days before applying my finishing coat, maybe because I was applying to a ~not as porous as plain wood~ surface or maybe because the North West is rainy and humid this time of year. Anyhow, I waited until the surface was not tacky before I proceeded to the next step.
 For the finishing I used two coats Minwax fast-drying Polyurethane in a clear semi-gloss following directions on the back of the can.
Below is an up close of the distressed or aged look I achieved.
The finished product!
The baskets are from Target, their dimensions are: 10" wide, 11.5" deep and 8.5" high but let me tell you that those dimensions are NOT labeled on the tag, I had to go to the automotive/hardware department and 'borrow' a tape measure....thank goodness it wasn't in an enclosed package.☺
Happy Creating!