Showing posts with label table. Show all posts

Tuesday, June 14, 2011

Lemonade for Sale!

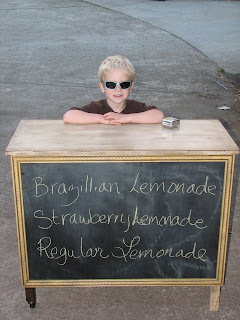
Every summer my kids have a lemonade stand, THIS year they'll be doing it in style! The excitement in the house is contagious, they've been talking about expanding their products and maybe do a 'breakfast stand' with donuts, bagels and muffins...we'll see if that one comes to pass (sounds like a lot of work for mom too). We're planning a family vacation and the kids are earning their own spending money. Mom's happy! Below is the shell of the stand.
 progress
 My helper! He wouldn't let me get a picture without him in it and honestly I like the picture better because of it. By the way that should be Brazilian Lemonade not BraziLLian Lemonade...oops!
 Detail of the tabletop.
 Detail of front & side
I think my husband thought I was nuts with all the time and effort I put into this, but it really was worth it to see their faces light up when they saw it finished.
I decided to attach wheels to one side, it makes it easy to get to the sidewalk.
Happy Crafting!

Saturday, June 4, 2011

Kids picnic table

So about a month ago my son and I were shopping when he came across a kids picnic table that he REALLY wanted, the only problem was the price tag. $80.00!!!! Sorry kid, I love ya but it isn't going to happen right now. I knew that it wouldn't be a hard build so I promised that I would make one.
I am so bad about getting 'in progress' pictures, by the time I remembered I was practically done with the build.
The original plan I started with only had a 31" long tabletop. My four year old wouldn't be able to sit more than one more friend at the table with him. I realized that I would be altering these plans for sure!
Another view, here you can see the under support which wasn't in the original plans. I felt it necessary to add this with the length added to the top. I also wanted to add an umbrella and felt that the lower support would be helpful with the umbrella as well.
 My four year old enjoying the table before the umbrella addition.
 Finished product!! I'm so happy with how it turned out, I even like it more than the table we found at Cost Plus World Market.
table dimensions
Tabletop: 41" wide by 18 1/4" deep
Overall depth: 34"
Height (without umbrella): 18 3/4"
 Happy Crafting!

Saturday, May 7, 2011

My Farmhouse Bedside Table

So, I'm not a builder. Really! Okay, I don't think that picture frames and a doll bed qualify me as a builder, but it's something I'm starting to really love. This build is what I'm adding to my resume for sure! The basic plans can be found here. To get this particular finish follow the steps below.
I started by giving my piece a worn out look, see video on how to achieve this look. I then spray painting my piece with two light coats of Valspar Baby Blue in a satin finish (found at Lowe's) with about a 30 minute drying time between each coat. After the final coat dried I sanded the piece being sure I distressed the edges well and in some flat places as well.
 After I sanded and wiped my piece down with a damp cloth I was ready for the stain. This is really where you'll see the 'worn out' look come to life. Using Minwax Dark Walnut stain and an old cotton t-shirt I applied with the grain making sure to saturate the piece especially in any crevices that would hold the stain and accentuate the 'old' look I wanted. I would then quickly wipe away with a clean cloth (this will take some practice to get the exact look you want so I suggest that you practice on a scrap piece of wood first). Minwax recommends that you wait a minimum of 8 hours. I waited at LEAST two days before applying my finishing coat, maybe because I was applying to a ~not as porous as plain wood~ surface or maybe because the North West is rainy and humid this time of year. Anyhow, I waited until the surface was not tacky before I proceeded to the next step.
 For the finishing I used two coats Minwax fast-drying Polyurethane in a clear semi-gloss following directions on the back of the can.
Below is an up close of the distressed or aged look I achieved.
The finished product!
The baskets are from Target, their dimensions are: 10" wide, 11.5" deep and 8.5" high but let me tell you that those dimensions are NOT labeled on the tag, I had to go to the automotive/hardware department and 'borrow' a tape measure....thank goodness it wasn't in an enclosed package.☺
Happy Creating!