Monday, November 21, 2011

Kayla's Scriptures

I had SO much fun putting this gift together!
 The scriptures were re-covered with some fun scrapbook paper and then laminated for extra protection, check out my inspiration HERE.
 My design of the scripture bag changed MANY times until I finally just got to sewing and came up with it as I went....probably should write down some dimensions.
 HAD to use the label!
*Auntie Jen*

Thursday, November 10, 2011

Taking the Challenge!

Ucreate & Ana White have teamed up to create a challenge, the Make Two Challenge. The idea is that if you are creating something to give as a gift, just make one more to donate....sounds easy enough.
The Challenge Begins!

Monday, September 26, 2011

I ♥ building cake stands!

I am completely falling in love with cake stands! On top of that I am loving making my own. I found this great tutorial over at Bee in our Bonnet, I just HAD to test out. One downfall was not finding the adorable scalloped trim but my search isn't over yet! I did end up going with some moulding I found at Lowe's...it did the job just fine.
I am awful at getting 'in the build' pictures, but I did get a couple of pre-paint pictures!
 This photo shows the moulding detail...I ended up liking it a lot! It seems more 'grown up' while the scallop would be great for a kids birthday.
 The finished product.
 On display!
♥ Happy Crafting ♥

Saturday, July 9, 2011

Cake request

A friend contacted me about doing a monkey cake for her, she sent me a picture of what she wanted (click here to view the picture she sent). And here is my version:
 Banana detail

Wednesday, June 29, 2011

Bathroom sign

I sure hope google translate is accurate. Here is bathroom in MANY different languages. I've been in LOVE with subway signs and I've finally made one.

Tuesday, June 14, 2011

Lemonade for Sale!

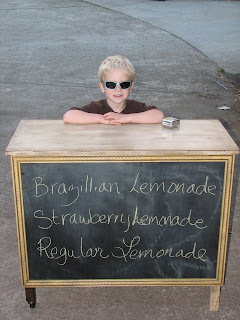
Every summer my kids have a lemonade stand, THIS year they'll be doing it in style! The excitement in the house is contagious, they've been talking about expanding their products and maybe do a 'breakfast stand' with donuts, bagels and muffins...we'll see if that one comes to pass (sounds like a lot of work for mom too). We're planning a family vacation and the kids are earning their own spending money. Mom's happy! Below is the shell of the stand.
 progress
 My helper! He wouldn't let me get a picture without him in it and honestly I like the picture better because of it. By the way that should be Brazilian Lemonade not BraziLLian Lemonade...oops!
 Detail of the tabletop.
 Detail of front & side
I think my husband thought I was nuts with all the time and effort I put into this, but it really was worth it to see their faces light up when they saw it finished.
I decided to attach wheels to one side, it makes it easy to get to the sidewalk.
Happy Crafting!

Thursday, June 9, 2011

Child size folding beach chair

Such a fun project! I will be making more for sure!
 I'm in love with the reversible seat! If you want stripes you get stripes, if you want polka dots you get polka dots.
 And it MUST be comfy if you can sleep on it!
Happy Crafting!

Saturday, June 4, 2011

Kids picnic table

So about a month ago my son and I were shopping when he came across a kids picnic table that he REALLY wanted, the only problem was the price tag. $80.00!!!! Sorry kid, I love ya but it isn't going to happen right now. I knew that it wouldn't be a hard build so I promised that I would make one.
I am so bad about getting 'in progress' pictures, by the time I remembered I was practically done with the build.
The original plan I started with only had a 31" long tabletop. My four year old wouldn't be able to sit more than one more friend at the table with him. I realized that I would be altering these plans for sure!
Another view, here you can see the under support which wasn't in the original plans. I felt it necessary to add this with the length added to the top. I also wanted to add an umbrella and felt that the lower support would be helpful with the umbrella as well.
 My four year old enjoying the table before the umbrella addition.
 Finished product!! I'm so happy with how it turned out, I even like it more than the table we found at Cost Plus World Market.
table dimensions
Tabletop: 41" wide by 18 1/4" deep
Overall depth: 34"
Height (without umbrella): 18 3/4"
 Happy Crafting!

Saturday, May 14, 2011

How to make a tear-out notepad

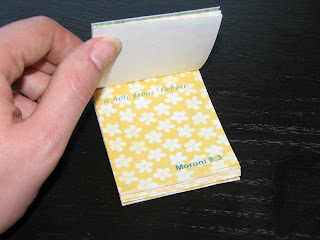
Below are the instructions to make this fun little notepad....enjoy!

Supplies:
1) double sided sticky tape
2) rubber cement
3) paper scorer
4) paper cutter
5) VERY heavy card stock (I purchased mine at a specialty paper store) or chipboard
6) 20# paper of choice (I scanned my scrap booking paper and printed onto 20# printer paper to get a matching notebook and cover). I used 4 pages cut to 9-2 1/2x3-inch pieces, making 36 sheets for my notebook.
7) heavy scrapbook paper of choice cut to 3x4-inches


(3)Score (7)scrapbook paper at 3 1/16" and then again at 3 5/16". Apply
(1)double sided tape to short end (see picture below).


Attach (5)Heavy card stock to (7)scrapbook paper being sure to butt the short side of the card stock right up against the scored edge. Apply (2)rubber cement liberally to the (7)scrapbook paper between score marks (picture below).


With the stack of (6)#20 paper apply the (2)rubber cement generously to the short end of the stack (picture below...sorry about the quality).

Be sure to press the (6)stack of paper firmly into the space between score marks until dry to the touch, this takes approximately 5 minutes. Set aside to fully dry.


Viola, you have yourself a beautiful little notepad that has tear-out pages.

Happy Crafting!

Friday, May 13, 2011

Sneak peek

I had some difficulty this morning posting instructions for this cute personalized note pad. Check back later for detailed instructions.

Monday, May 9, 2011

Wow, Happy Mother's Day to ME!

....and Father's Day to my husband. I now understand why people can say that their build project was an afternoon project. No more hand saw.

I ♥ my chop saw!

 You KNOW it's important if the hubby needs to read the instruction manual! I don't think he's EVER broken into one in all of the 12 years we've been married.
 Isn't she BEAUTIFUL!
Stay tuned to find out what I'm making with it.....

Saturday, May 7, 2011

My Farmhouse Bedside Table

So, I'm not a builder. Really! Okay, I don't think that picture frames and a doll bed qualify me as a builder, but it's something I'm starting to really love. This build is what I'm adding to my resume for sure! The basic plans can be found here. To get this particular finish follow the steps below.
I started by giving my piece a worn out look, see video on how to achieve this look. I then spray painting my piece with two light coats of Valspar Baby Blue in a satin finish (found at Lowe's) with about a 30 minute drying time between each coat. After the final coat dried I sanded the piece being sure I distressed the edges well and in some flat places as well.
 After I sanded and wiped my piece down with a damp cloth I was ready for the stain. This is really where you'll see the 'worn out' look come to life. Using Minwax Dark Walnut stain and an old cotton t-shirt I applied with the grain making sure to saturate the piece especially in any crevices that would hold the stain and accentuate the 'old' look I wanted. I would then quickly wipe away with a clean cloth (this will take some practice to get the exact look you want so I suggest that you practice on a scrap piece of wood first). Minwax recommends that you wait a minimum of 8 hours. I waited at LEAST two days before applying my finishing coat, maybe because I was applying to a ~not as porous as plain wood~ surface or maybe because the North West is rainy and humid this time of year. Anyhow, I waited until the surface was not tacky before I proceeded to the next step.
 For the finishing I used two coats Minwax fast-drying Polyurethane in a clear semi-gloss following directions on the back of the can.
Below is an up close of the distressed or aged look I achieved.
The finished product!
The baskets are from Target, their dimensions are: 10" wide, 11.5" deep and 8.5" high but let me tell you that those dimensions are NOT labeled on the tag, I had to go to the automotive/hardware department and 'borrow' a tape measure....thank goodness it wasn't in an enclosed package.☺
Happy Creating!